Migrating CI to GitHub Actions
10 May 2022
I have just been going through the process of migrating all of my continuous integration (CI) to use GitHub Actions. The reason for migrating is because one of my previous CI providers, Travis, stopped being free for open source repositories, they gave some free “credits” but they have now been consumed. The pricing plan and website is also now confusing for Travis; they have OSS (Open Source) credits and private credits which were consumed from my OSS projects! The pricing starts at $69 a month, which is a bit steep for me, especially considering there are other free alternatives. So I decided to move entirely to GitHub Actions and the process has really been straightforward and has given me a chance to improve my CI setup.
I have used and tried a fair few CI services: Travis, Circle, AppVeyor, Jenkins and TeamCity. I also used GitHub Actions prior to this migration for a few repositories and had tried it out at work as well. GitHub Actions only came about in 2018 so prior to that there were fewer options, I had been using Travis for macOS, iOS and Linux builds and AppVeyor for windows builds because Travis did not initially support Windows. Having multiple providers is not too much of a problem and all of these services integrate into GitHub very easily, but still it is a little inconsistent having multiple providers so I am now trying to move everything to Actions for simplicity. In addition to moving all of my personal projects to GitHub Actions, I have also been moving all of my work projects to Actions as well so the last month has been a whirlwind of work all revolving around GitHub Actions!
CI is a Necessity
It seems like CI is a fairly new thing - when I started out coding there wasn’t as much focus towards continuous integration or test driven development; it took years for me to hear of these concepts. In some roles earlier in my career we had very little build automation, in some cases building packages manually. Nowadays CI is essential to me for any project, even stuff I am doing in my spare time. Typically I am working with multi-platform code so I want the code to be compiled for all of the platforms and permutations to know it is safe to merge, and then go one better and run tests to ensure the code is good. CI allows you to make changes and if the CI passes you can be confident that the changes you have made were good. Bugs and issues can still creep in of course and some things are harder to test than others, but having some lines of defence against build breakages and regressions is crucial.
Relaxing Weekend DevOps
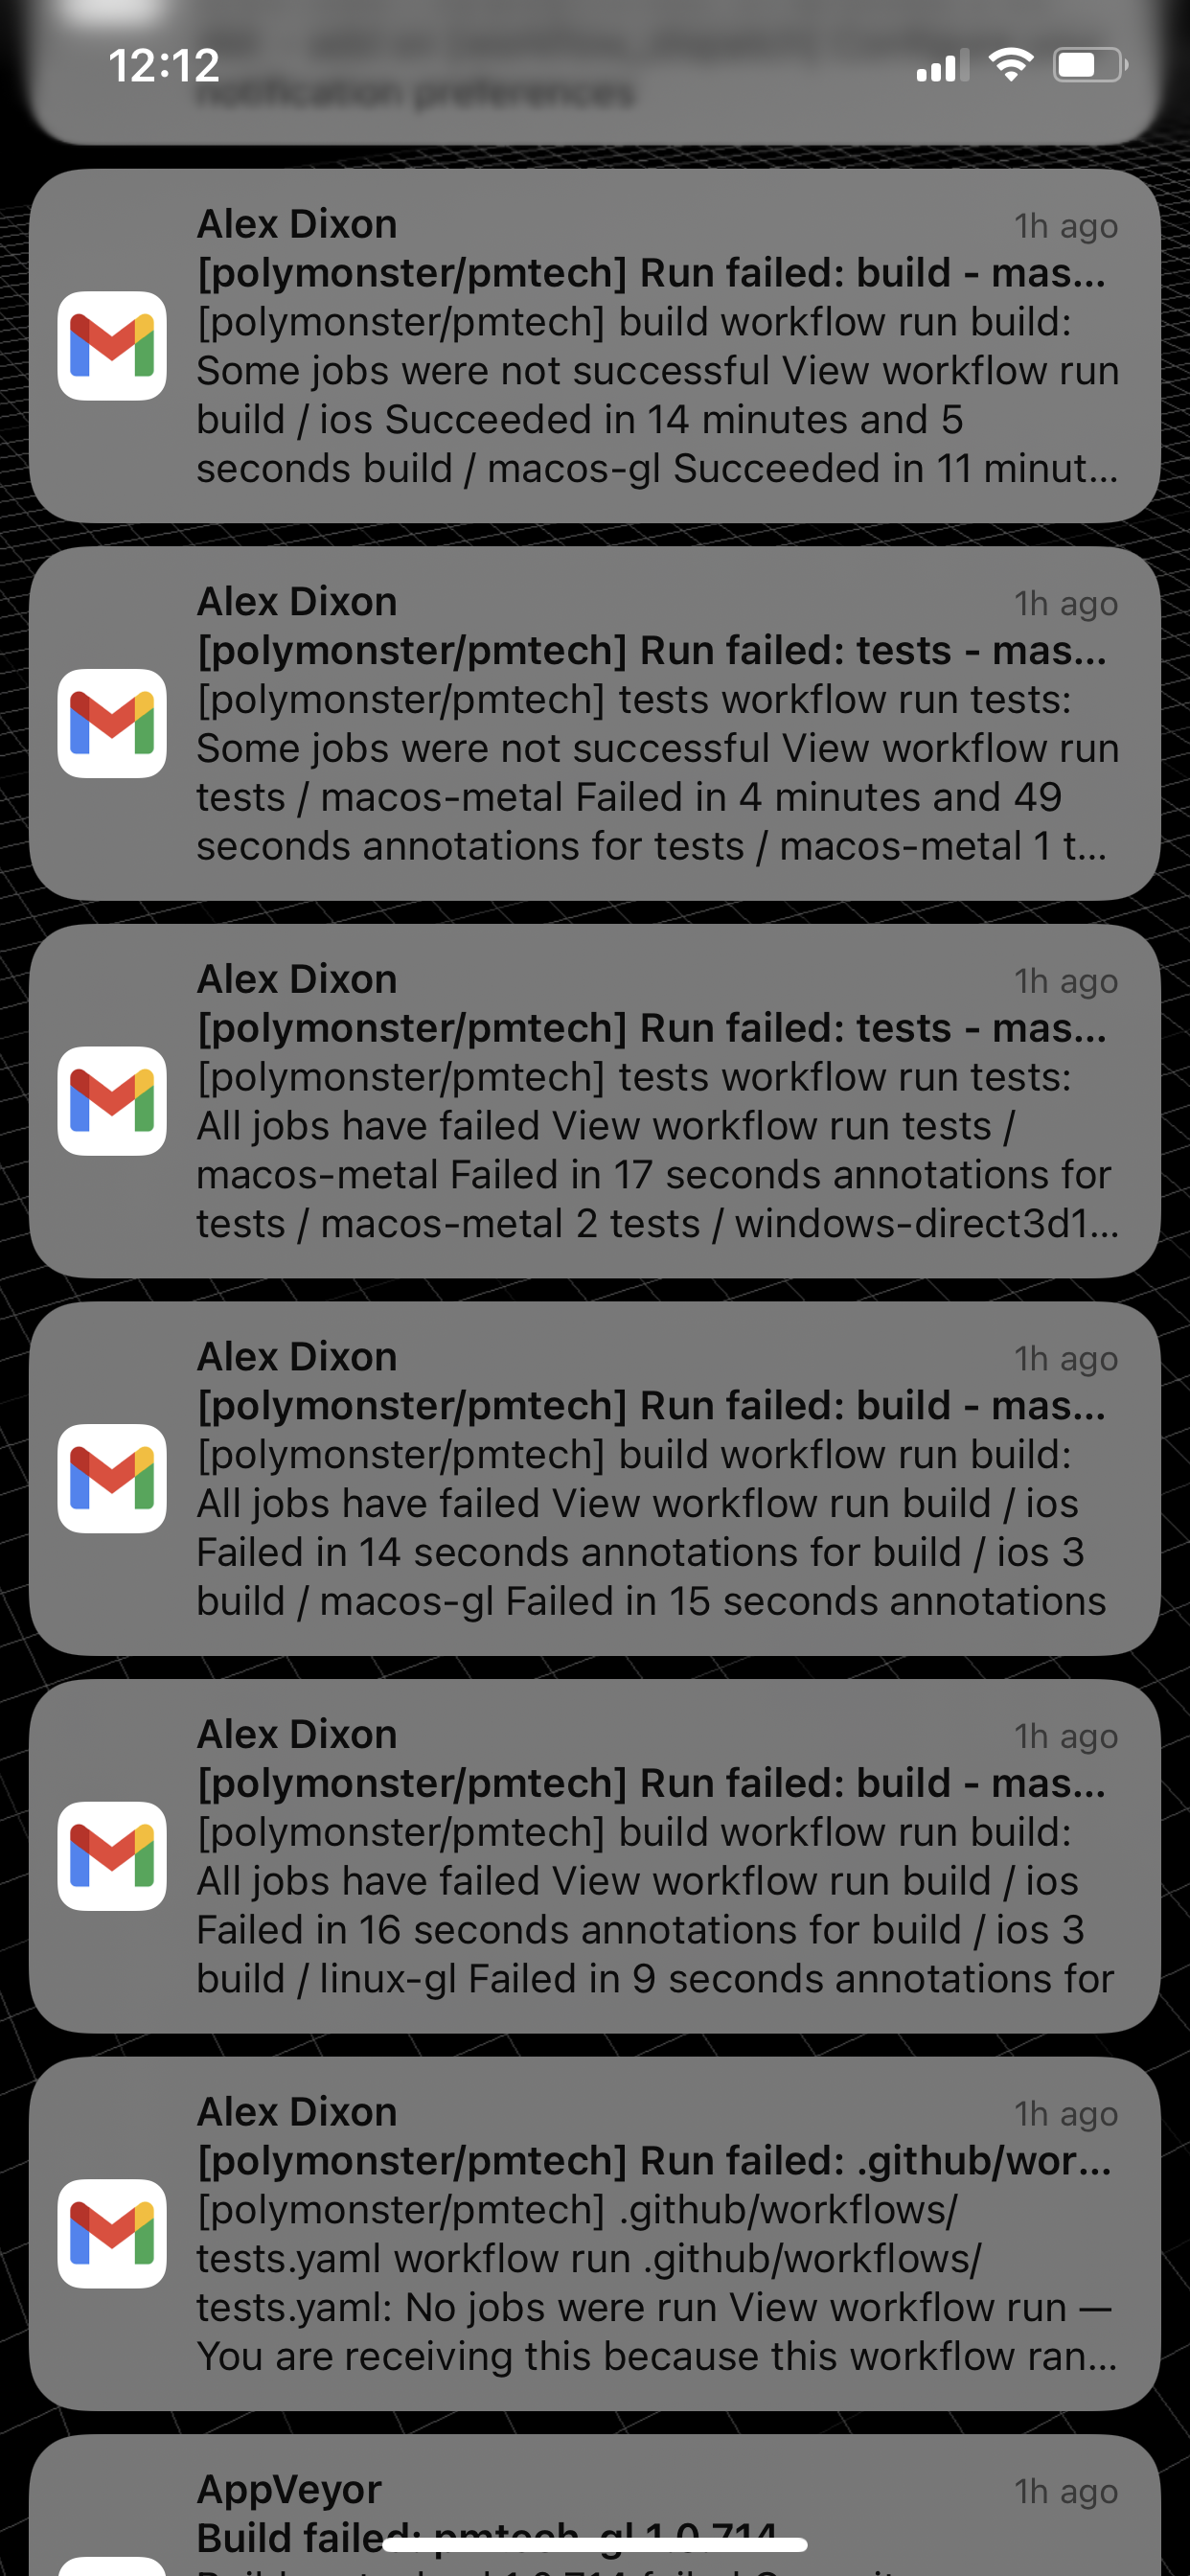
I find DevOps work quite relaxing, often spending my weekend mornings with a coffee just fixing up some small issues and watching the builds roll in. If you have less automation it requires more work to test all of your configurations, so I suppose knowing of a world that exists without CI and having had to live through that, putting in the work to make sure you have good build and test coverage feels satisfying. Once you have good coverage you make small changes and tweaks to your code with the CI as a safety net to catch anything that goes wrong… it helps to make the rest of your programming life easier and more comfortable. One thing that can happen though on a day fixing up builds is a deluge of commits and failed builds. Multiple commits and pushes with messages like “fix ci”, “fix macos” etc and then an inbox full of build failure emails.
After going through all that and getting your builds all green everything feels just right. Once you’ve got your builds all green it’s like a drug - you never want to go back to failing builds again.
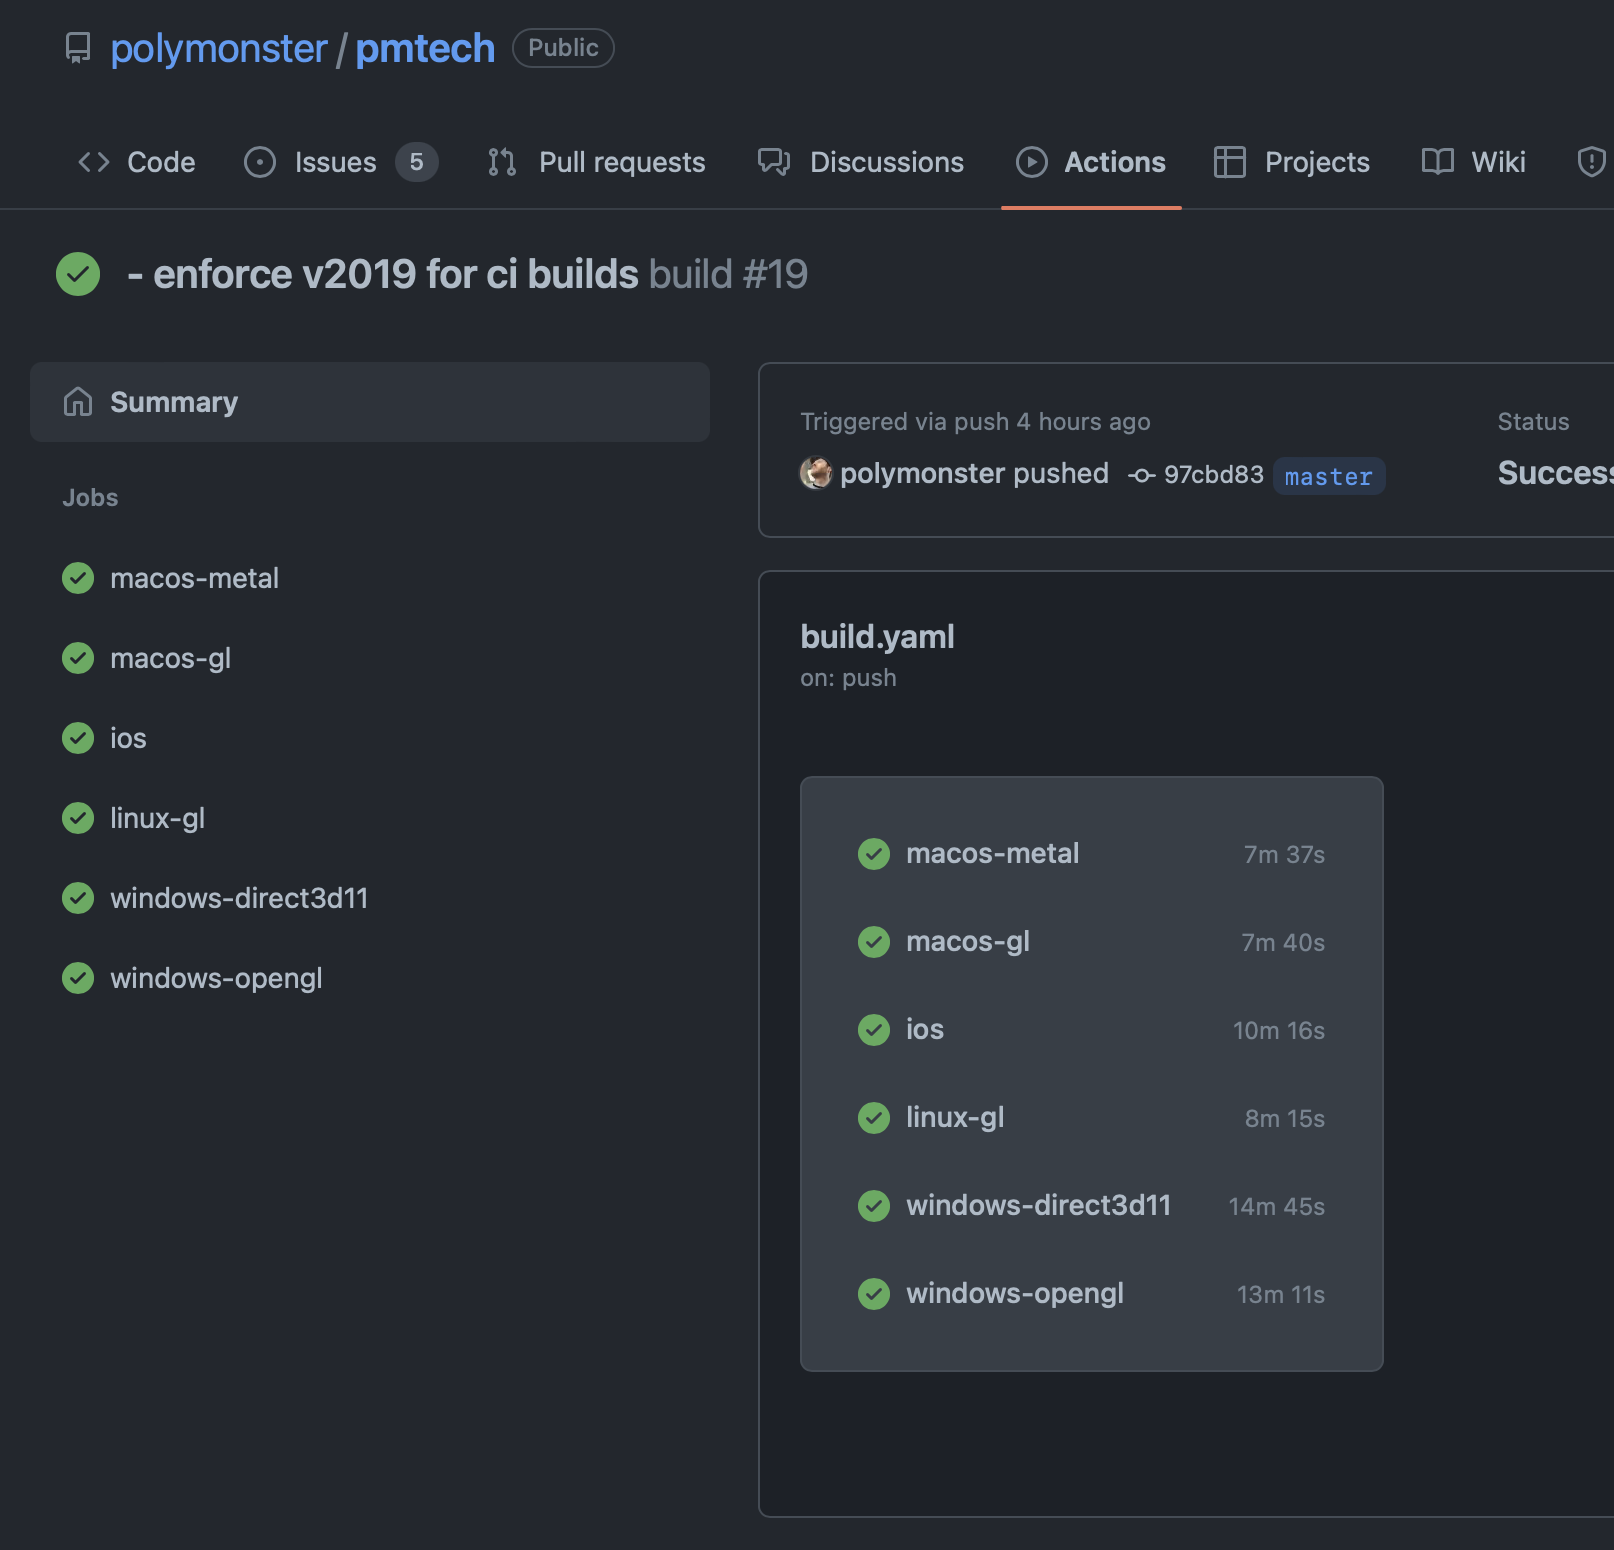
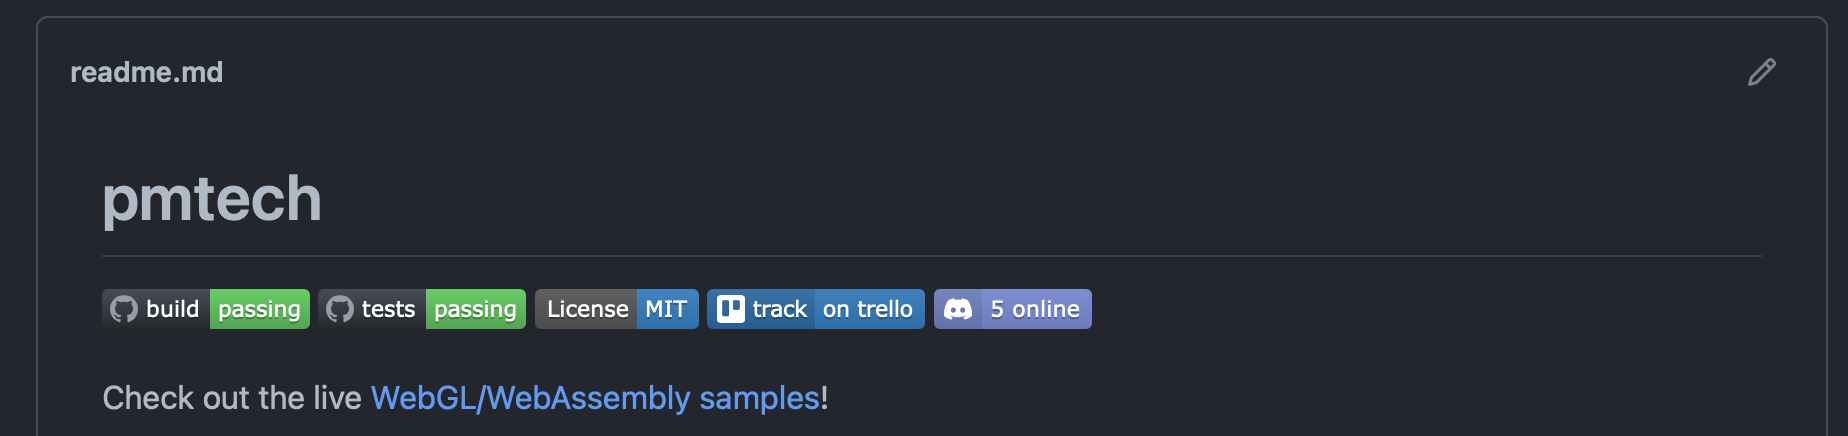
And then don’t forget to add badges to your repo readme so you tell the rest of the world, “hey look everything is cool if you want to try building my code”. When you see passing CI badges on a repository it signals a lot of time and effort has been put in to keep everything running smoothly and stable, like a DJ bringing a bag of vinyl, you know they’ve put in the work.
Cloud Builds
GitHub provides cloud builds which are free for open source projects, which is really great, you can spin up a macOS, Windows or Linux machine and build your code. It’s really handy to have cloud machines that can do the work for you because they are always available and you can get good build coverage, especially when you build on every push.
name: build
on: [push]
jobs:
 macos-metal:
   runs-on: macos-latest
   steps:
     - uses: actions/checkout@v3
       with:
         submodules: "recursive"
         lfs: true
     - run: .ci/mac-metal.sh
There are some downsides to the cloud hosted builds though, firstly for private repositories you will have to pay for build minutes, typically Linux costs you 1x minutes, Windows minutes cost 2x and macOS minutes cost 10x! I was trialling GitHub Actions at work and because we had a lot of iOS / macOS builds running frequently, the monthly free minutes get burned through quite quickly and then you can start racking up quite a cost. At one point a build runner got stuck and used up all of our minutes (good job we had a spending limit set up). I had seen horror stories like this with AWS customers racking up 70k monthly bills… In that case they were given the money back in good faith, GitHub did not give us anything back in good faith.
In addition to the cost, cloud builds can be a little more limited. I have this maths repository which has fairly decent test coverage and compilation coverage. This case is quite easy for a cloud build because it’s just C++ code and it can be run on any server and can run on Linux, which is also convenient because it always seems like there are more Linux runners available and thus you spend less time on builds because you spend less time waiting for a runner. In the case of my game engine pmtech I have graphical tests that can run, but the tests require a GPU and I had struggled with various CI providers to try and get software rendering to work in Direct3D in order to run the tests. I was able to get the tests to run with software rendering on Windows through AppVeyor, but only if you remote desktop connected into the machine; if it ran headless then the tests would just output black. Metal API does not have a software renderer and I was only able to get an ancient OpenGL 2.x context on Linux machines, so for a few years I would just run my tests locally on the machines I have available.
Having cloud builds is handy for projects that suit it because you can run the CI on every push and have some servers in the cloud that will always be available. I am making use of totally cloud based builds in these repositories: maths, jsn, premake-android-studio. But for the more complex tests that I need, GitHub Actions provides self hosted runners which are the answer to all my prayers.
Every Gunner is a Runner
GitHub Actions lets you set up your own self hosted runners and these cost nothing to set up or use. For private repositories they are a great solution, especially to the 10x cost of macOS build runners. But more importantly these runners can be installed on any machines you have around, which means they will get a GPU or other hardware that you may desire. You can connect dev kits or mobile devices so you can run tests on exotic platforms that may not be available in the cloud. You can create an organisation-wide runner (if you are an organisation) or you can set up runners per repository. Installation is simple; you can access the instructions through the GitHub website by going to your user or organisation Settings > Actions > Runners > New self-hosted runner. This gives command line steps to fetch and install the runner.
For my home projects I have set up both my Windows desktop and MacBook Pro as build runners and this allows me to run my graphics tests. The tests can be configured to run only on these self-hosted runners and only when I manually trigger a build.
name: tests
on: [workflow_dispatch]
jobs:
 windows-direct3d11:
   runs-on: [self-hosted, Windows]
   steps:
     - uses: actions/checkout@v3
       with:
         submodules: "recursive"
         lfs: true
     - run: |
         cd examples
         ..\\pmbuild win32 -libs
         ..\\pmbuild win32
         ..\\pmbuild make win32 all /p:Platform=x64 /p:Configuration=Release
         ..\\pmbuild launch win32 all -test
Because of the machine the runners are installed on, running the tests on every push is excessive so I set the tests to be run on a manual trigger by using on: [workflow_dispatch] so I can ensure that my machines are running and then watch the tests roll by.
To get better coverage I have separated builds and tests on my repositories, so on every push or pull request the build runs which compiles the code for the various platform configurations. This uses cloud runners so I don’t need to worry about ensuring my self hosted runners are on, and then I can choose to manually run the tests.
Depending on how many people are in the team and how you like to work, it’s easy to configure how your builds and tests run. In my personal projects I am just running builds on every push and I work mostly into the main branch. In a production environment it’s better to work on branches which can run builds on push and then accept pull requests on the main branch after they pass all the tests. With a lot of people working on branches it can sometimes become confusing to sift through multiple broken branch builds, so just having CI builds and tests on a pull request is also a good approach. You can also setup more strict checks for pull requests before merging; allowing unused variables or warnings during development is helpful sometimes because -Werror can be obstructive, but at the time of merging a PR it’s nice to fix up any warnings to keep the build output clean for everyone else.
Parameterized Builds
I had some old Jenkins freestyle jobs which were parameterized and you can also do the same in GitHub Actions, workflow_dispatch triggers can take input parameters as well.
on:
 workflow_dispatch:
   inputs:
     project:
       type: choice
       required: true
       description: Project Name
       options:
       - examples
       - crane
       - erica
     delete_orphans:
       required: true
       default: true
The inputs are provided in a nice UI on the GitHub website when you manually trigger a workflow.

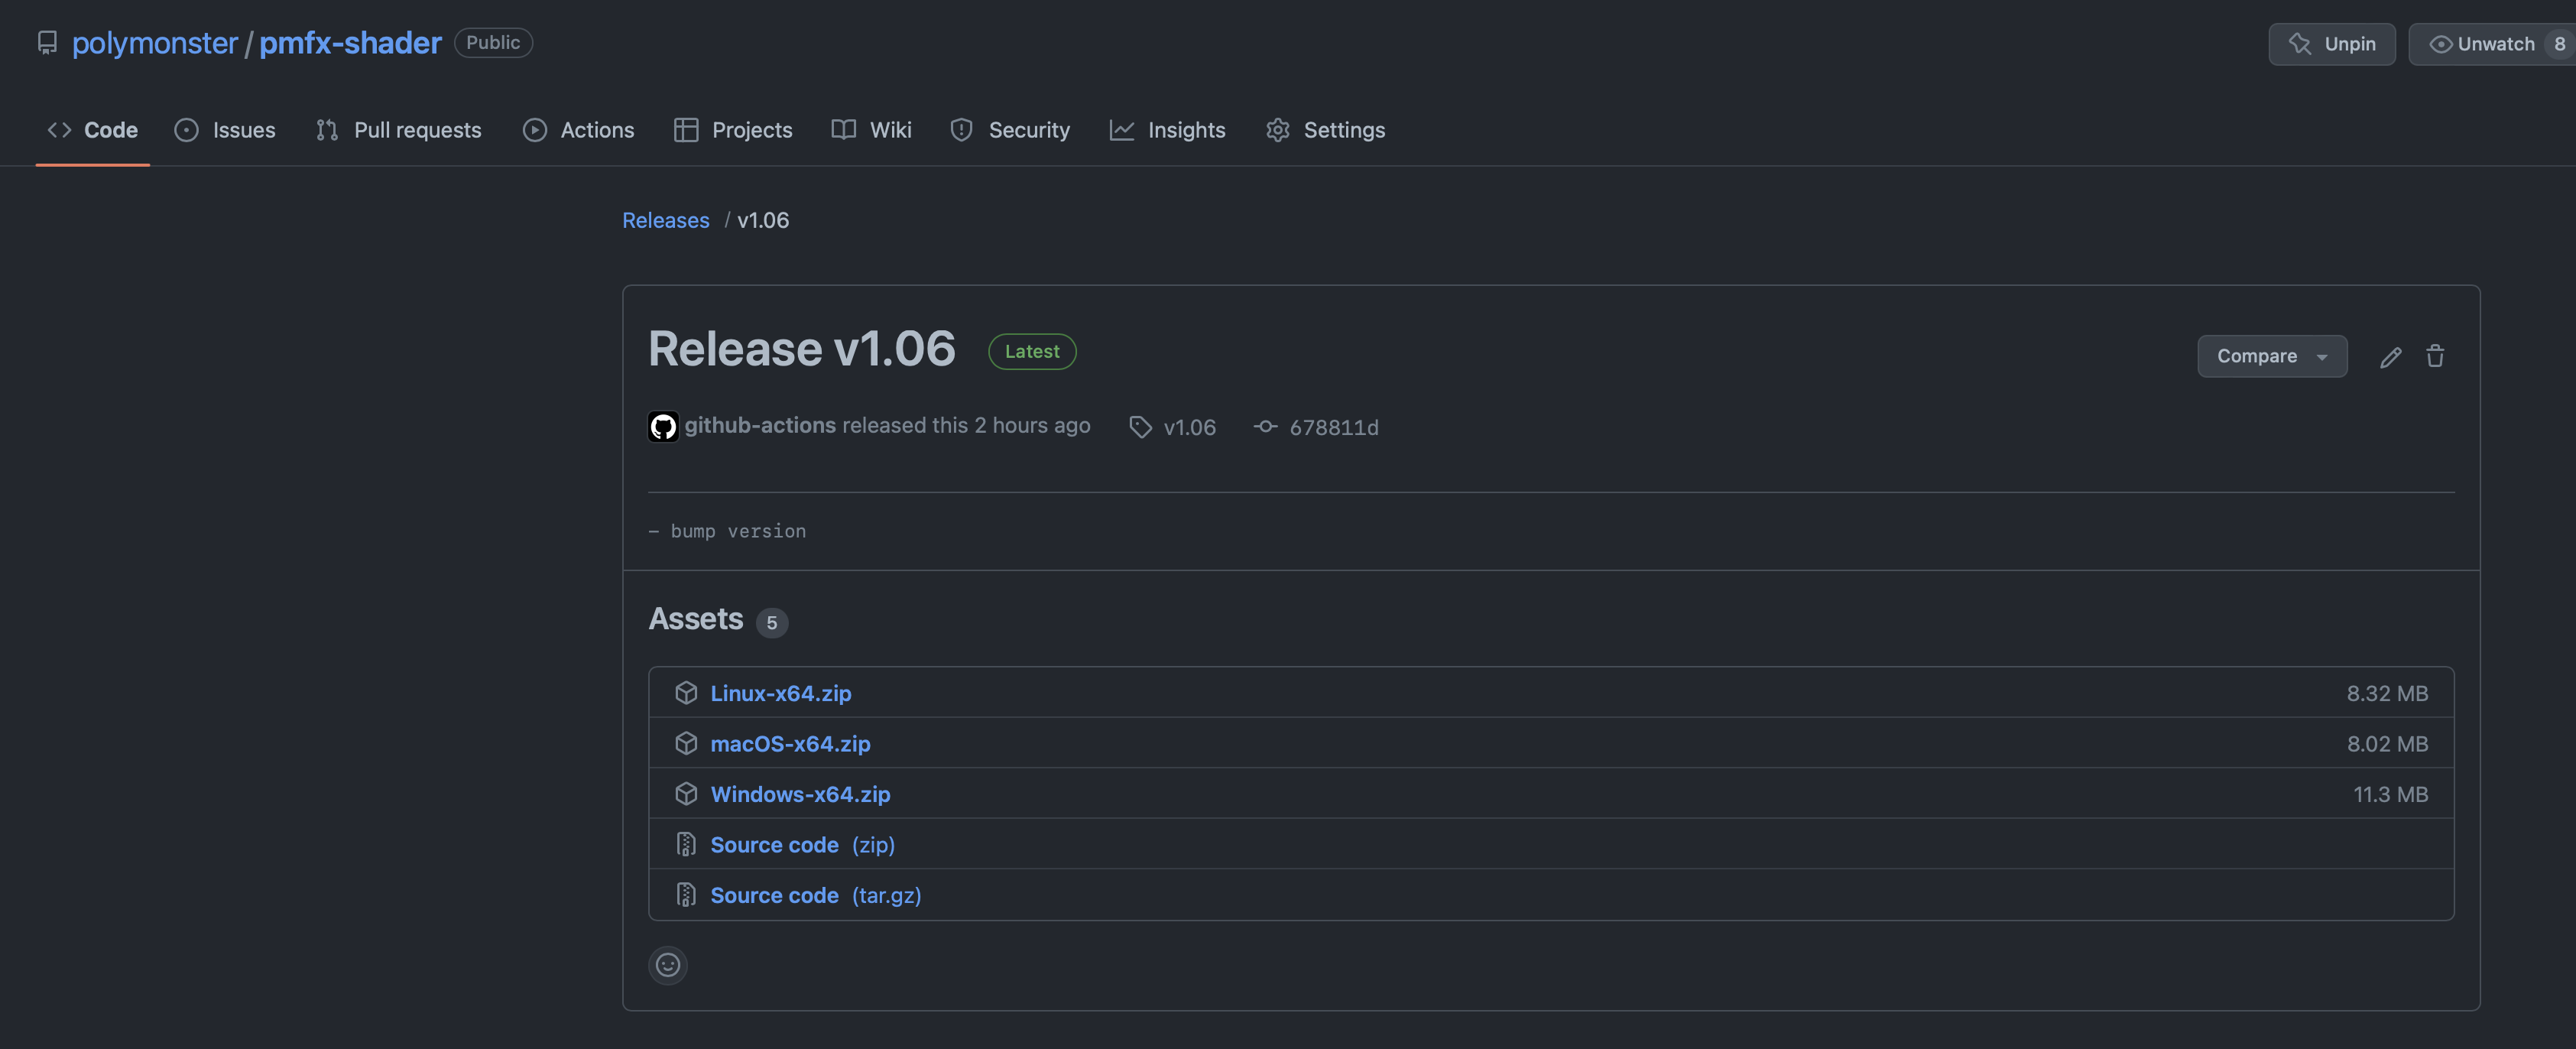
Releases
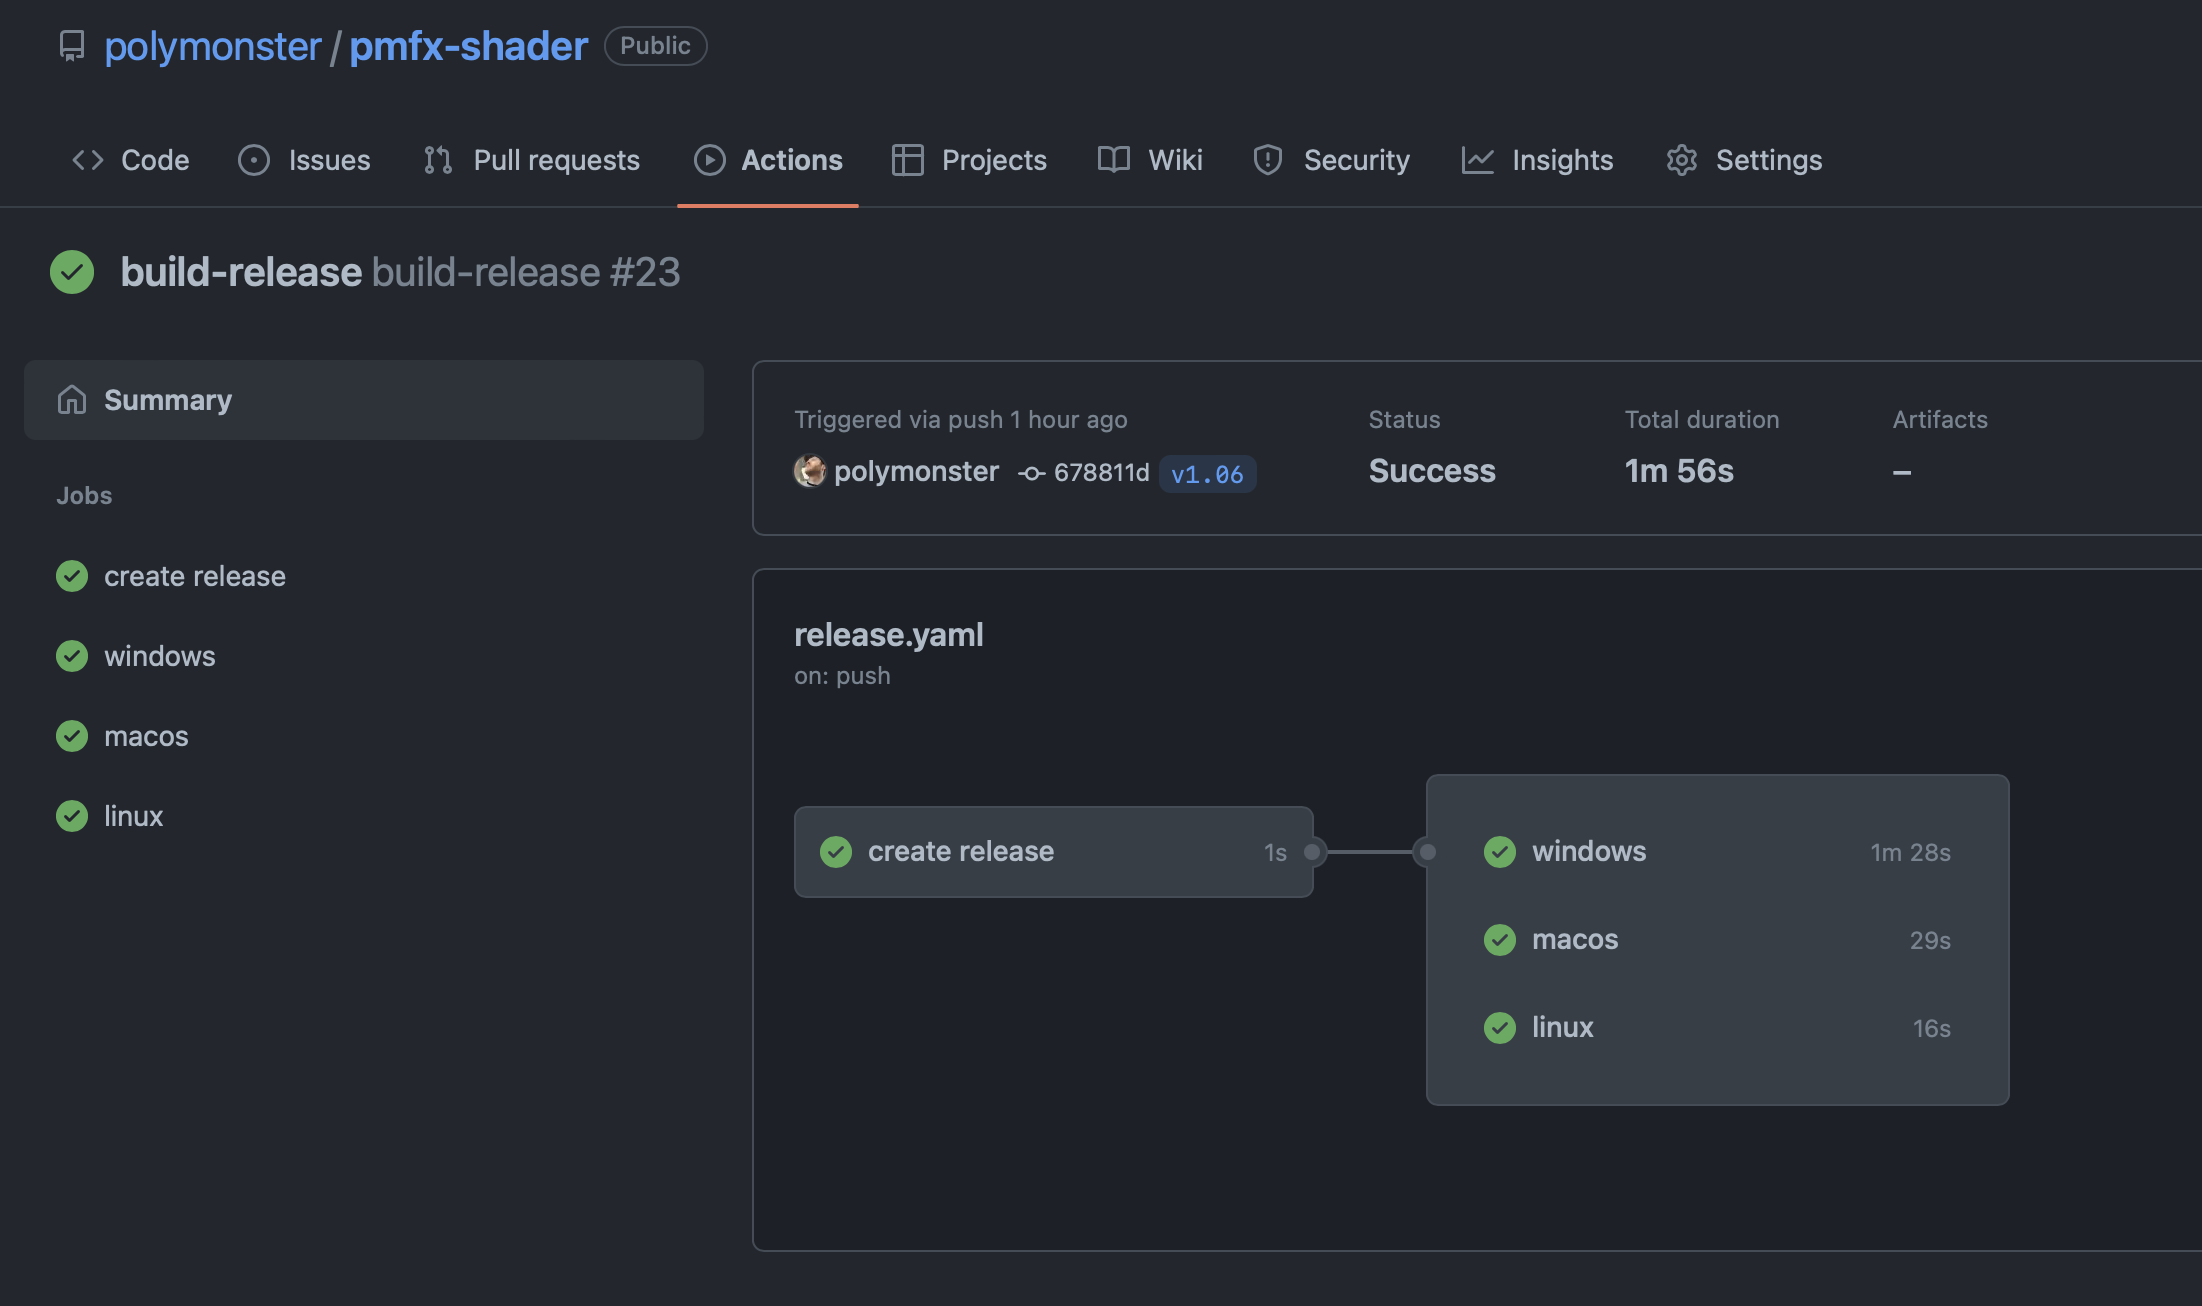
Prior to GitHub Actions at work we were using Jenkins freestyle jobs. I had long wanted to move to Jenkins pipelines, but it’s always something that gets pushed back as I am not a dedicated DevOps engineer (nor do we have one) and working with a small team we have a lot of other stuff on our plate. With freestyle jobs we had some mildly awkward processes that required multiple steps. With GitHub Actions I have configured a few builds which have multiple steps and dependencies. A release can be made simply by running a few git commands and then the build steps run synchronised to one another culminating with a release on the GitHub repository home page.
on:
 push:
   tags:
   - 'v*'
git tag v1.06
git push --tags
jobs:
 setup:
   name: create release
   runs-on: ubuntu-latest
   steps:
     - name: create_release
       id: create_release
       uses: actions/create-release@v1
       env:
         GITHUB_TOKEN: $
       with:
         tag_name: $
         release_name: Release $
         draft: false
         prerelease: false
   outputs:
     upload_url: $
 windows:
   needs: setup
   name: windows
   runs-on: windows-latest
   steps:
     - name: checkout
       uses: actions/checkout@v2
       with:
         submodules: "recursive"
     - name: pyinstaller
       run: "pip install PyInstaller"
     - name: build
       run: pyinstaller scripts\pmbuild.py --onefile -i NONE --distpath build/dist/ --workpath build/work/
     - name: zip
       run: Compress-Archive -LiteralPath build/dist -DestinationPath build/Windows-x64.zip
     - name: upload
       id: upload-release-asset
       uses: actions/upload-release-asset@v1
       env:
         GITHUB_TOKEN: $
       with:
         upload_url: $
         asset_path: ./build/Windows-x64.zip
         asset_name: Windows-x64.zip
         asset_content_type: application/zip
The first step creates a release, then multiple releases are built; in this case a python build using PyInstaller to build python code into an executable. The built executables are bundled with some other executables and files, zipped up and uploaded to the releases on github. The key here is the needs: setup member of the windows job, this creates a dependency to wait on setup, which is the part that actually creates a release on GitHub we can upload to. The setup step runs on ubuntu-latest because as I mentioned earlier, Linux builds seem to start quicker than other platforms and cost less money. We don’t need anything platform specific for that step and I would always suggest running any platform agnostic builds or tasks on a Linux machine.
Then all you need to do is sit back, relax and wait for the build to come through… or realise it has failed and start sweating profusely while you scramble to fix the build before the deadline.
Once the release has completed building, the source code and any build artifacts are uploaded to the GitHub repositories releases page where you can get easy access to download them.
Some Final Issues
I am very happy with GitHub Actions having migrated pretty much everything I am working on both at work and at home. There aren’t any complaints really, but I will list a few things which I found useful or took me a while to figure out.
If you have the actions runner running as a service on Windows it will not be able to launch windowed / graphical applications, so you need to run these from a command prompt on the machine that is launched and waiting for jobs to pickup, this made my runners from a service redundant and I am instead launching a .bat file at startup to start the runners in a way which can run windowed apps.
The secrets.GITHUB_TOKEN is handy for uploading releases or pushing to the repo, but if you are using private repositories and require the runner to checkout private submodules you need to provide an access token. You can add the access token as a secret on the repository. You are not able to generate access tokens for an organisation so you need to have some kind of build-bot account or generate the access token yourself. Once you set the secrets you can’t see them again so this makes it reasonable to generate one from your own account.
If you are doing iOS TestFlight builds and require signing, be ready for incessant builds in order to finally get a build through. I had endless problems with Jenkins and the same with GitHub Actions, but in the end my best solution was to ensure the machine was able to build and sign locally first and then make sure to unlock the keychain with secrets and generating an app specific password to upload with altool… oh and don’t forget to pass -allowProvisioningUpdates along with automatic signing in ExportOptions.plist.
security unlock-keychain -p $ ~/Library/Keychains/login.keychain",
security set-key-partition-list -S apple-tool:,apple: -s -k $ ~/Library/Keychains/login.keychain",
xcodebuild archive -workspace project.xcworkspace -configuration Release -scheme crane -archivePath project -allowProvisioningUpdates
xcodebuild -exportArchive -archivePath project.xcarchive -exportPath export/ -exportOptionsPlist ../../source/ios/ExportOptions.plist -allowProvisioningUpdates
xcrun altool --upload-app -f export/project.ipa -t ios -u email -p $
Another thing, and probably my only major issue right now, is when wanting to use multiple runners on the same machine you need to install multiple runners with their own directory and workspace. This differs from Jenkins where each job has its own workspace and the agent instances share the workspace. This isn’t much of an issue until you have jobs which may use a lot of data. We have some build jobs which transcode video footage and the source footage may be in the 10’s-100’s of terabytes, so having all of this data duplicated can consume a lot of disk space. With a Jenkins setup we only have single jobs for each project which the agents (Jenkins equivalent of runner) share the work space of, so we have no redundant data duplication. This is something I will have to think about and consider ways of sharing this heavy data load across multiple actions runners.
Reference and Examples
If you want to check out my current setup I have quite a few public repositories using GitHub actions, there is still a lot I don’t know and as I previously mentioned, I am not a dedicated DevOps guy so there are probably better examples out there. These are good enough for my needs though:
- pmtech - Has CI cloud builds for multiple platforms and self-hosted tests which run on hardware
- hotline - Has builds and tests which run on self-hosted runners, here I plan on adding more granular unit tests than
pmtech - pmfx-shader - Has an actions release cadence which automatically builds the python into executable for easier distribution
- pmbuild - Same setup to
pmfx-shader - jsn - This has an action which will build and publish a package to
PyPI - maths - Has cloud CI builds for different C++ compilers and tests which easily run on cloud machines. Also generates
codecovreport for test coverage. - premake-android-studio - A cloud friendly test build which has proven to be both a blessing and a curse as the over complex Android SDK/NDK, Gradle, Maven, CMake build system is constantly being changed and deprecated. This is an ongoing battle to keep alive!
Follow / Subscribe
If you liked this article, follow me on the various social media platforms which I have links to on this site and keep an eye out for more posts in future.